When I visited RadareCon last year, I learned about Frida, a dynamic binary instrumentation framework. And what seemed only interesting at first, turned out to be quite a lot of fun. Remember God mode in games? That’s what Frida feels like for native apps. This is a blog post about using Frida for playing with Android apps specifically. And since we are at it, we are also going to solve a little Android crackme in part II of this post.
What is Dynamic Binary Instrumentation?
Dynamic binary instrumentation (DBI) means to inject foreign code into existing (running) binaries to make them do things they didn’t do before. It is not exploiting, since the code injection does not happen via vulnerabilities you have to figure out before. It is not debugging, since you are not attaching a debugger to the binary, though you can do similar things. What can you do with DBI? Pretty cool stuff:
- Access process memory
- Overwrite functions while the application is running
- Call functions from imported classes
- Find object instances on the heap and use them
- Hook, trace and intercept functions etc.
Of course, you can also do all of this with a debugger but that brings various hurdles. E.g. in Android, you have to disassemble and recompile an application to make it debuggable. Some apps detect and try to prevent debuggers and you would need to get rid of that logic. Possible, but cumbersome. DBI with Frida gets you started quickly and with black box processes.
FRIDA
Frida “lets you inject snippets of JavaScript or your own library into native apps on Windows, macOS, Linux, iOS, Android, and QNX.” While it was first based on Google’s V8 Javascript runtime, since version 9 Frida now uses Duktape internally but it still lets you switch back to V8 if you need it. There are various modes of operations how Frida can interact with binaries (including the possibility to instrument apps on non-rooted devices), but we stick with the most common usecase here and don’t care about the internals for now.
To get started, you need
- Frida (I’m using version 9.1.16 for this tutorial)
- A
frida-serverbinary from the release page (- it isfrida-server-9.1.16-android-arm.xzat the time of writing. The frida-server version should match your Frida version.) - An Android emulator or rooted device. Frida has been developed with Android 4.4 ARM in mind but it should work with later versions. I successfully used it with Android 7.1.1 ARM for this tutorial. For the crackme in the second part, we need something later than Android 4.4 anyway.
I’m also assuming a linux system as host OS and you would probably have to adjust some of the commands if you work with Windows or Mac, which should also be possible.
If you want to follow along in solving the OWASP Unbreakable Crackme Level 1, which is solved in the second part of this post, you should also download
Frida provides a variety of APIs and ways to start. You can use the command line interface or tools like frida-trace which track low-level functions (like ‘open’ calls in libc.so) for a quick run. You can use C, NodeJS or Python bindings for more sophisticated stuff. Internally, Frida works a lot with Javascript and you will do most of your instrumentation work in this language. So if you like me always disliked Javascript a little (besides its XSS capabilities) Frida is another reason to become familiar with it.
If you haven’t, install Frida (check the README for alternative ways to install):
pip install frida
npm install frida
Start your emulator or connect your device and make sure that adb is running and lists your device:
michael@sixtyseven:~$ adb devices
List of devices attached
emulator-5556	device
Then install frida-server. Extract the archive and put the binary on the device:
adb push /home/michael/Downloads/frida-server-9.1.16-android-arm /data/local/tmp/frida-server
Open a shell with adb on the device, switch to root and start frida:
adb shell
su
cd /data/local/tmp
chmod 755 frida-server
./frida-server
(Note 1: If frida-server doesn’t start, make sure that you are root and that the file has been transfered correctly. I had various strange errors related to a corrupted file transfer. Note 2: If you want to start frida-server as background process, use ./frida-server &)
In another terminal, in a regular OS shell, check if Frida is running and lists processes on Android:
frida-ps -U
the -U stands for USB and lets Frida check for USB-devices but it also works with the emulator. You should get a process list like this:
michael@sixtyseven:~$ frida-ps -U
 PID  Name
----  --------------------------------------------------
 696  adbd
5828  android.ext.services
6188  android.process.acore
5210  audioserver
5211  cameraserver
8334  com.android.calendar
6685  com.android.chrome
6245  com.android.deskclock
5528  com.android.inputmethod.latin
6120  com.android.phone
6485  com.android.printspooler
8355  com.android.providers.calendar
5844  com.android.systemui
7944  com.google.android.apps.nexuslauncher
6416  com.google.android.gms
[...]
You can see the process id (PID) and the running process (Name). With Frida, you can now hook into any of these processes and start tampering.
E.g. you can trace specific calls done by Chrome (start Chrome before in the emulator if it isn’t running):
frida-trace -i "open" -U com.android.chrome
This gives you:
michael@sixtyseven:~$ frida-trace -i open -U -f com.android.chrome
Instrumenting functions...
open: Loaded handler at "/home/michael/__handlers__/libc.so/open.js"
Started tracing 1 function. Press Ctrl+C to stop.
           /* TID 0x2740 */
   282 ms  open(pathname=0xa843ffc9, flags=0x80002)
           /* TID 0x2755 */
   299 ms  open(pathname=0xa80d0c44, flags=0x2)
           /* TID 0x2756 */
   309 ms  open(pathname=0xa80d0c44, flags=0x2)
           /* TID 0x2740 */
   341 ms  open(pathname=0xa80d06f7, flags=0x2)
   592 ms  open(pathname=0xa77dd3bc, flags=0x0)
   596 ms  open(pathname=0xa80d06f7, flags=0x2)
   699 ms  open(pathname=0xa80d105e, flags=0x80000)
   717 ms  open(pathname=0x9aff0d70, flags=0x42)
   742 ms  open(pathname=0x9ceffda0, flags=0x0)
   758 ms  open(pathname=0xa63b04c0, flags=0x0)
The frida-trace command generates a little javascript file that Frida injects into the process and that traces specific calls. Have a look at the generated open.js script at __handlers__/libc.so/open.js. It hooks the open function from libc.so and outputs the arguments. This is actually pretty easy to do in Frida:
[...]
onEnter: function (log, args, state) {
    log("open(" + "pathname=" + args[0] + ", flags=" + args[1] + ")");
},
[...]
Notice how Frida provides access to the arguments of the calls to the open function (args[0], args[1] etc.) that Chrome calls internally. Let us modify the script a little. Wouldn’t it be nice if we would output the paths to the files that get opened in plain text, instead of the memory addresses where those paths are stored? Fortunately, we can access memory with Frida directly. Have a look at the Frida API and the Memory object. We can modify our script to output the content of the memory locations as UTF8 strings and get a much clearer output. After modifying the script like this:
onEnter: function (log, args, state) {
    log("open(" + "pathname=" + Memory.readUtf8String(args[0])+ ", flags=" + args[1] + ")");
},
(we just added the Memory.readUtf8String function) we get:
michael@sixtyseven:~$ frida-trace -i open -U -f com.android.chrome
Instrumenting functions...
open: Loaded handler at "/home/michael/__handlers__/libc.so/open.js"
Started tracing 1 function. Press Ctrl+C to stop.
           /* TID 0x29bf */
   240 ms  open(pathname=/dev/binder, flags=0x80002)
           /* TID 0x29d3 */
   259 ms  open(pathname=/dev/ashmem, flags=0x2)
           /* TID 0x29d4 */
   269 ms  open(pathname=/dev/ashmem, flags=0x2)
           /* TID 0x29bf */
   291 ms  open(pathname=/sys/qemu_trace/process_name, flags=0x2)
   453 ms  open(pathname=/dev/alarm, flags=0x0)
   456 ms  open(pathname=/sys/qemu_trace/process_name, flags=0x2)
   562 ms  open(pathname=/proc/self/cmdline, flags=0x80000)
   576 ms  open(pathname=/data/dalvik-cache/arm/system@app@Chrome@Chrome.apk@classes.dex.flock, flags=0x42)
Frida prints the pathnames. Easy, wasn’t it?
Another thing to note here is that you can either start an app before you let Frida inject its magic or pass the -f option to Frida to let it spawn the process itself.
Now we take a look at Fridas command line interface frida-cli:
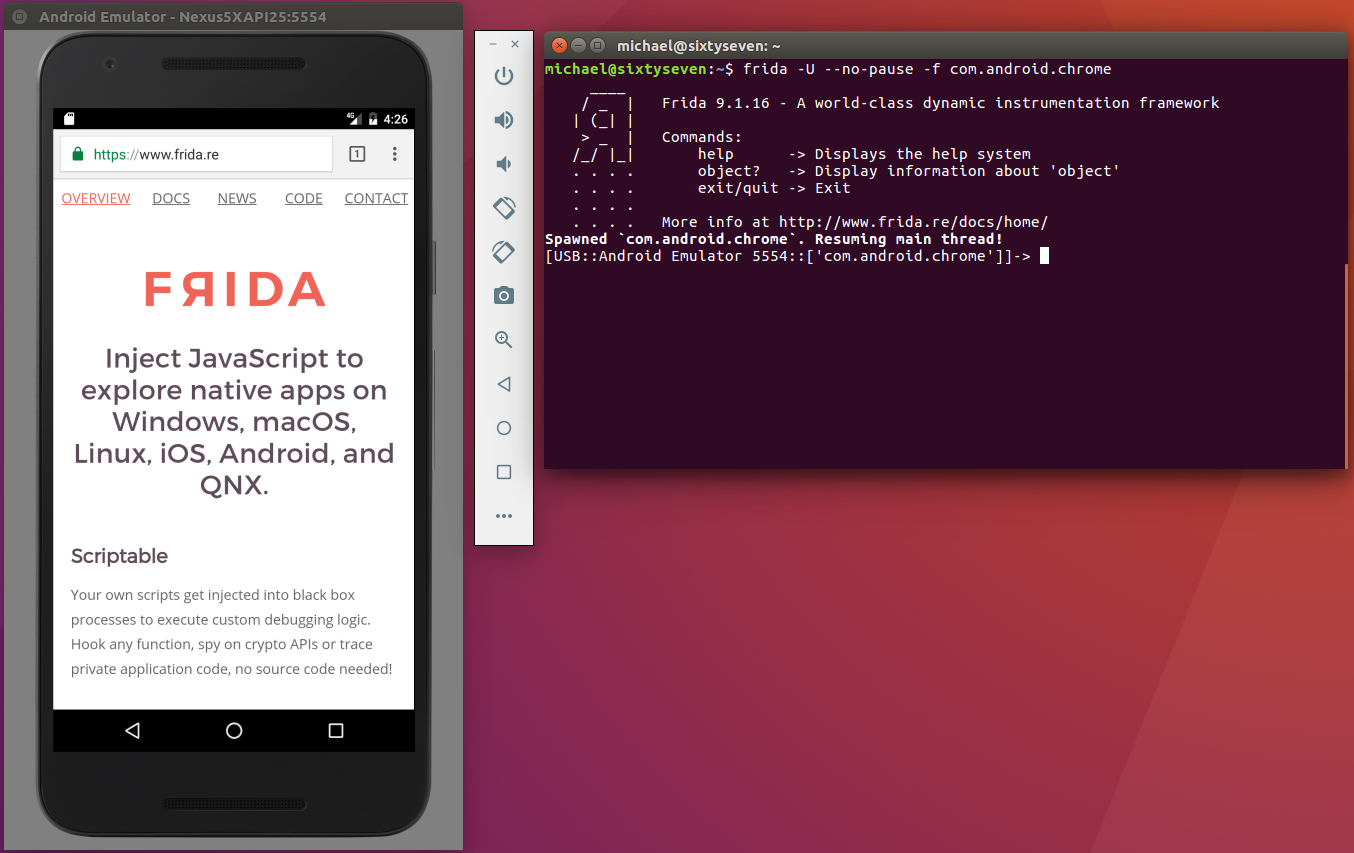
frida -U -f com.android.chrome
This starts Frida and the Chrome app. However, it doesn’t launch Chrome’s main process yet. This is meant to give you the possibility to inject Frida code before the main process of the app starts. Unfortunately, in my case it always lead to getting the app killed automatically after 2 seconds. This is not what we want. You can either use these 2 seconds to type %resume, as the cli output suggest, and let the app start its main process. Or you start Frida directly with the --no-pause option to not interrupt the app startup at all and still leave the spawning of the process to Frida.
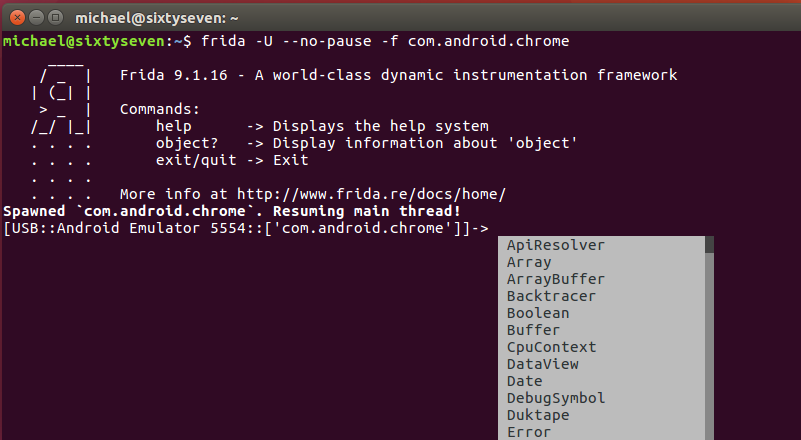
In both cases, you get a shell (that doesn’t get killed) to which you can now write commands to Frida using its Javascript API. Press TAB to see available commands. The shell also supports command completion.
Most what you can do is well documented. For Android, check the Java section of the Javascript-API especially (I’m going to talk about a “Java API” here though it is technically speaking a Javascript wrapper for accessing Java objects). We are going to focus on the Java API in what follows, since this is the more convenient way to work with Android apps. Instead of hooking libc functions, we can actually work with Java functions and objects directly. (Note: If you are interested in what you can do with Frida outside of the Java API, hooking the more low-level C functions of Android as we did with frida-trace, check out the functions section of the docs. I’m not going to follow this path here.)
To start with Java API access, just display the running Android version from Frida’s command line interface:
[USB::Android Emulator 5556::['com.android.chrome']]-> Java.androidVersion
"7.1.1"
Or list loaded classes (WARNING: This will give you a lot of output. I’m going to explain the code soon.):
[USB::Android Emulator 5556::['com.android.chrome']]-> Java.perform(function(){Java.enumerateLoadedClasses({"onMatch":function(className){ console.log(className) },"onComplete":function(){}})})

org.apache.http.HttpEntityEnclosingRequest
org.apache.http.ProtocolVersion
org.apache.http.HttpResponse
org.apache.http.impl.cookie.DateParseException
org.apache.http.HeaderIterator
We entered quite a long command here, some nested function code to be precise. Notice first, that the code we entered is wrapped in a Java.perform(function(){ ... }) which is a requirement of Fridas Java API.
Here is the body of the function we inserted in the Java.perform wrapper:
Java.enumerateLoadedClasses(
  {
  "onMatch": function(className){
        console.log(className)
    },
  "onComplete":function(){}
  }
)
Quite simple: We enumerate all loaded classes using Java.enumerateLoadedClassesfrom Fridas API and output every match to the console with console.log. This kind of callback object is a pattern that you often find in Frida. You provide an callback-object of the form
{
  "onMatch":function(arg1, ...){ ... },
  "onComplete":function(){ ... },
}
onMatch gets called with 1 or more arguments once Frida finds a match for your request, and onComplete when Frida finished iterating through possible matches.
Now we dive deeper into Frida’s magic and overwrite a function with Frida. Besides, we also load our code from an external script instead of typing it into the cli, which is more convenient. Save the following code to a script file, e.g. chrome.js:
Java.perform(function () {
    var Activity = Java.use("android.app.Activity");
    Activity.onResume.implementation = function () {
        console.log("[*] onResume() got called!");
        this.onResume();
    };
});
This code overwrites the onResume function of the android.app.Activity class. It calls Java.use to receive a wrapped object of this class and accesses the implementationproperty of its onResume function to provide a new implementation. Inside the new function body, it calls the original onResume implementation via this.onResume() so the app can continue to run normally.
Open your emulator, open Chrome and inject the script with the -l option:
frida -U -l chrome.js com.android.chrome
Once you trigger an onResume - e.g. by switching to another application and back to Chrome in the emulator, you get:
[*] onResume() got called!
Nice, isn’t it? We actually overwrote a function from the app. That gives us many possibilities to control our target app’s behaviour. But we can do more: We can also look for instantiated objects on the heap with Java.choose.
Before we contine, a caveat: Frida sometimes tends to time out when your emulation is a little slow. To prevent this, either wrap your scripts in the function setImmediate or export them as rpc. RPC’s in Frida by default don’t time out (- thanks to @oleavr for these tips). setImmediate automatically reruns your scripts in Frida once you modify the script file, so this is pretty convenient. It also runs your script in the background. That means you get a cli immediately, even though Frida still processes your script. Just keep waiting and don’t leave the cli until Frida shows you the output of your scripts. Modify your chrome.js again:
setImmediate(function() {
    console.log("[*] Starting script");
    Java.perform(function () {

        Java.choose("android.view.View", {

             "onMatch":function(instance){
                  console.log("[*] Instance found");
             },

             "onComplete":function() {
                  console.log("[*] Finished heap search")
             }
        });

    });
});
Running it via frida -U -l chrome.js com.android.chrome should produce the following output:
[*] Starting script
[*] Instance found
[*] Instance found
[*] Instance found
[*] Instance found
[*] Finished heap search
So we found 4 instances of android.view.View objects on the heap. Let’s see what we can do with these. Maybe we can call an object method of these instances. We simply add instance.toString() to our console.log output (- since we used setImmediate we can now just modify our script and Frida will reload it automatically):
setImmediate(function() {
    console.log("[*] Starting script");
    Java.perform(function () {

        Java.choose("android.view.View", {

             "onMatch":function(instance){
                  console.log("[*] Instance found: " + instance.toString());
             },

             "onComplete":function() {
                  console.log("[*] Finished heap search")
             }
        });

    });
});
This returns:
[*] Starting script
[*] Instance found: android.view.View{7ccea78 G.ED..... ......ID 0,0-0,0 #7f0c01fc app:id/action_bar_black_background}
[*] Instance found: android.view.View{2809551 V.ED..... ........ 0,1731-0,1731 #7f0c01ff app:id/menu_anchor_stub}
[*] Instance found: android.view.View{be471b6 G.ED..... ......I. 0,0-0,0 #7f0c01f5 app:id/location_bar_verbose_status_separator}
[*] Instance found: android.view.View{3ae0eb7 V.ED..... ........ 0,0-1080,63 #102002f android:id/statusBarBackground}
[*] Finished heap search
Frida actually called for us the toString method of the android.view.View object instance. Cool. So with Frida’s help, we can read process memory, modify functions, find actual object instances and use them with only a few lines of code.
Now you should have a basic overview on Frida and be able to dive deeper into its documentation and API on your own. To finish this post, I want to touch on two more topics, Frida’s bindings and r2frida. But first, a little warning.
Caveats
When you experiment with Frida, you will notice that there are some instabilities. First, injecting foreign code into another process is prone to lead to crashes since the app gets triggered to behave in unexpected ways. Second, Frida itself still feels experimental. It works but you often have to try more than one way to get the desired result. E.g. Frida would always crash when I tried to load a script and spawn a process in one command from the command line. Instead, I had to bring up the process first and then let Frida inject the script. This is why I showed you various ways to use Frida and prevent timeouts. You might need to figure out yourself what works best in your case.
Python bindings
If you want to automate your work with Frida even more, you should check out the Python, C or NodeJS Bindings that are easy to use, once you understood how Frida works. E.g. to inject your chrome.js script from Python, you could use Frida’s Python bindings and create a chrome.py script:
#!/usr/bin/python
import frida

# put your javascript-code here
jscode= """
console.log("[*] Starting script");

Java.perform(function() {

   var Activity = Java.use("android.app.Activity");
    Activity.onResume.implementation = function () {
        console.log("[*] onResume() got called!");
        this.onResume();
    };

});

"""

# startup frida and attach to com.android.chrome process on a usb device
session = frida.get_usb_device().attach("com.android.chrome")

# create a script for frida of jsccode
script = session.create_script(jscode)

# and load the script
script.load()
If you want to end your Frida session and destroy the scripts insterted this session, you can call session.detach().
For more examples, as always, check Frida’s documentation.
Frida and Radare2: r2frida
Wouldn’t it be nice if we also could use a disassembler framework like Radare2 to inspect our app’s memory? Here comes r2frida. You can use r2frida to connect Radare2 to Frida and do static analysis and disassemblies of process memory. I’m not going into detail with r2frida here, since it presupposes knowledge of Radare2 (which is totally worth to check out if you haven’t), but nonetheless I want to give you an impression of how easy it is to use.
You can install r2frida by using Radare2’s packet management (assuming that you have Radare2 already installed):
r2pm install r2frida
Go back to our frida-trace example, delete or rename our modified script, let frida-trace generate the default one again and have another look at the logs:
michael@sixtyseven:~$ frida-trace -i open -U -f com.android.chrome
Instrumenting functions...
open: Loaded handler at "/home/michael/__handlers__/libc.so/open.js"
Started tracing 1 function. Press Ctrl+C to stop.
           /* TID 0x2740 */
   282 ms  open(pathname=0xa843ffc9, flags=0x80002)
           /* TID 0x2755 */
   [...]
With r2frida, you can easily inspect the displayed memory addresses and read the pathnames (in this case /dev/binder):
root@sixtyseven:~# r2 frida://emulator-5556/com.android.chrome
 -- Enhance your graphs by increasing the size of the block and graph.depth eval variable.
[0x00000000]> s 0xa843ffc9
[0xa843ffc9]> px
- offset -   0 1  2 3  4 5  6 7  8 9  A B  C D  E F  0123456789ABCDEF
0xa843ffc9  2f64 6576 2f62 696e 6465 7200 4269 6e64  /dev/binder.Bind
0xa843ffd9  6572 2069 6f63 746c 2074 6f20 6f62 7461  er ioctl to obta
0xa843ffe9  696e 2076 6572 7369 6f6e 2066 6169 6c65  in version faile
0xa843fff9  643a 2025 7300 4269 6e64 6572 2064 7269  d: %s.Binder dri
[...]
The syntax to access a process and let r2frida do its injection is
r2 frida://DEVICE-ID/PROCESS
Also check the available r2frida-commands that you can reach with the =! prefix and which, among other things, let you search memory regions for specific content quickly or write to arbitrary memory addresses:
[0x00000000]> =!?
r2frida commands available via =!
?                          Show this help
?V                         Show target Frida version
/[x][j] <string|hexpairs>  Search hex/string pattern in memory ranges (see search.in=?)
/w[j] string               Search wide string
[...]
More to come
If this made you curious, check out
- Frida’s project page
- @oleavr’s talk from r2con on Youtube and David Weinstein’s Frida Intro talk.
- Frida’s Twitter account @fridadotre
- Frida’s Telegram channel
- AppMon, a GUI tool for app monitoring and injection based on Frida (by @dpnishant)
In the second part of this tutorial, we are going to use Frida to solve a little crackme with ease.
For comments, questions, critique etc. contact me on Twitter.